Followers

Wednesday, 8 June 2011

CD Sunday - Digi Day

I printed this Digi image - from our Sponsor this month -  Stitchy Bear Stamps straight to  to parchment and then coloured and embossed from the back. I used blendable pencils - Faber Castell Polychromos. The border pattern I used  was from 'Say it with Flowers and Lace' CD by Florence Holmes. The backing paper is rainbow card.
I printed the border pattern  from the Cd on to an A4 piece of copier paper .  The border appears on the righthand side of the landscape orientation of the paper.  I then measure how far in from the far lefthand edge the border finishes and the same from the top, right and bottom edges.  E.g. Lefthand edge 175mm,  35mm each top, right and bottom.  I put these measurements into my printer and then using parchment paper print the digi image to 'fill the page'.  As I have already reduced the printable area and placed it where I  want it then the border will fit perfectly around the image.  The border is already on the piece of copier paper ready for me to trace and emboss on the parchment.  I use this simple technique to place all printed images to parchment so that I can size and place  them where I want them.  If you have a complicated grid pattern it is always sensible to make a template and then do the measuring for the printer.

I am a mite late this week posting my DT card and in visiting our challengees as I have been away.  Good luck in the draw to everyone.

Monday, 30 May 2011

Miniature Handbag No: 11


Almost there - just one more after this for the dozen.  I especially enjoyed making this one.  I altered the pattern a little.  The outside bag should have been plain parchment with flower designs inked and embossed and then dorsoed with colour on the back but I decided to use some parchment I had printed from one of my favourite Carol Ann's Studio CD's.  For the liner I used another parchment I had printed - this time from a download.  Where I have the large sparkly brads should have been eyelets but my eyelets weren't deep enough to take the 3 layers of parchment so I managed to find just 4 suitable brads from my box.
For the fastener Amanda (designer) had used a bead toggle she had made that you can buy from her website but I made my own.  Heaven knows I have enough beads to make thousands of them.  That just added to the - all made by me - feeling.
Here is a close up of the toggle:

Sunday, 29 May 2011

Miniature Handbag No: 10

CD Sunday - Say it with Scallops

 Another great challenge for you we hope from the CD Sunday team.  My fellow teamies have come up with some very different designs.  I am sure they will be delighted if you visit them to find out more about their cards. I had to put my thinking cap on for this one but I enjoyed putting it all together.
 The image of the sea and the BP used for the card come from Ooh La La 'Dreams of Tranquility' - Goddess of the Sea. The parchment scallop is taken from a pattern in the parchment magazine and I have added the beads. The scalloped oval (parchment) is sewn on with beads and the buttons and card candy are from stash. The sentiment from Carol Ann's Studio.
I look forward to visiting your Blogs  and seeing what clever designs you all come up with.  They are always an inspiration.
Thank you for being with us as a guest designer  Jen.  I have enjoyed your cards and especially this week as I have the same stamp and it has always been a favourite - brilliant with Sakura pens.

Saturday, 28 May 2011

Miniature Handbags Nos: 8 & 9

I think I have almost enough for the show.  Perhaps a round dozen would be good number.  I know they are totally impracticable but they are fun to make and they do show a different aspect of parchment crafting.
For these two I have used plain parchment that I have printed on myself (well my printer did the work). I can't remember where the first pattern came from but the second was a bought download and is a favourite diffused pattern  especially when I am making flowers.
The second bag is called a 'Knitting Bag' in the design book and is quite an intricate pattern.  At least it looks very intricate when you first look but like most things if you follow step by step it becomes clear and you wonder why you thought that you might not bother with that one.

Thursday, 26 May 2011

Wednesday, 25 May 2011

Miniature Handbag No:6

I know we are super critical of our own work but I have to be honest and say that this one is very very slightly wonky. It proved to be very fiddly to put together and I don't think I got it quite right.  Hence it is photographed hanging from my lilac tree and not flat on a table. It will look alright though on display because it will be hanging from one of those' Foto' tree thingies.
I always learn something whenever I embark on a project like this and accuracy is the keyword here.

Monday, 23 May 2011

FlowerFlies and Flutterbugs - part 4 - new folder

I found the design for this border in my box of saved bits and pieces.  I can't remember whose design it is but I had wanted to do it again.  The image is of course from Debbees new Cd  -' FlowerFlies and Flutterbugs' and this time I have used an image that has some FlowerFlies or FlutterBugs?  The lightweight card I have used as a mount and for the punched flowers comes from the kit I bought recently from Craftwork Cards.

Sunday, 22 May 2011

FlowerFlies and Flutterbugs - part 3 - new folder

Another border of my own design.  In fact even more my own design this time as I put a couple of embossed dots in the wrong place so I re-designed as I went along.  As you can see this is another clear, unfussy but pretty image which can be used as is or froo frooed (new word).  I tried to match my pencils used in the border to the colours in the image and those dragonflies are so  special.  They are from C & C and are treasured stash.
For newcomers this image is from a new Cd in the stable of Debbees CD's and is called FlowerFlies and Flutterbugs.   Link in my sidebar.

FlowerFlies and Flutterbugs - part 2

I kept looking at the card that I made yesterday and something wasn't right and I finally decided that the broderie anglaise embellishment was just too heavy in style for the card.  On this new Cd, Debs has added folders of flower parts  - one for each of the image folders.  They include a couple of styles of flowers and several different size leaves.  So I printed out flower parts folder 13 in parchment and added the result to the card.  I think it is much better now and  am happy with it.  What do you think?

Here are a couple of close-ups

CD Sunday Challenge - Under the weather

I hope that all our visitors and challengees are well and not 'Under the weather'  but if anyone you know is a little down then I hope we have some inspiration for you in this weeks challenge.

As Jenny said I did two this week.  I did this one first which is all from Robert Addams CD 'Watercolour Flowers'.  This is a great Cd as all the  images have blank counterparts for you to use your paints or promarkers.

Then I decided I wanted to do this Stitch and Bead card.  The pattern is a purchased download from Stitching Cards.  For the card itself I  printed out two sheets of backing paper from a Carol Ann's Studio Cd and made my own weave paper.  I then scanned this and used MCS to add the words and print out direct to A4 card.
He looks as though he is also feeling proper poorly  but has brought you some flowers.
We look forward to visiting all your Blogs so please join our challenge.
xx

Saturday, 21 May 2011

FlowerFlies and Flutterbugs - a new Cd by Debbees Cd's

This is from Debbees great new Cd and I have used the image in Folder 13.  Just printed straight to parchment using a specified size to fit the border I was going to use -  which is of my own design.  After the border I embossed the image lightly in some areas to give a 3D effect and bring out the colours.  I have added some Broderie Anglaise lace threaded with toning ribbon.  The base card is faintly coloured linen look 280gsm card. The delicate colour comes from the matching backing papers on the CD.
This great Cd has 26 toppers and lots of tiles, backing papers etc.
I have a link to Debbees CD's in my sidebar so you may visit at the click of your mouse.

Friday, 20 May 2011

Birdbath - pattern by Judith Maslen (Freebie)

I love the subject and simplicity of this card.  Well it should have been simple.  A little white ink work, whitework embossing and no colour work.  A lovely border done on a grid and Bob's your Uncle.
The border is done on a FINE PCA grid. It is a beautiful design and should have been easy but I wasn't really up to par yesterday and shouldn't really have tackled it.  But I did and the first attempt was rubbish - and so was the second  and then the third.  By this time determination had set in and I finally gave up last night at the 8th attempt.  A good nights sleep and feeling much better the 9th attempt was a triumph.  I was a bit heavy handed with some of the whitework on the column and the parchment is a little crinkled but I have finished it.
I like the end result though and somehow it looks a little like Wedgwood.

Wednesday, 18 May 2011

Miniature Handbags Nos 4 & 5


The yellow one took hours to make.  Much longer than I had expected and I did need some patience as it would have been so easy to abandon it altogether. The second - Lilac one - was much easier.  I used parchment that I had printed with a pattern so half the work was done before I started.
I also tried out a new butterfly pattern in the current Parchment Magazine.  It will be a little tidier when I have a second go at it now I have done the pattern once


Monday, 16 May 2011

Glamour Girls - 'Party Time'

Yes - this is another of Judith's wonderful patterns.  There are three of these Glamour Girls in the series and this is my second.  I don't know if it was intentional in Judith's design or if it is my interpretation but to me this Glamour Girl looks decidedly squiffy.

Miniature Handbag in Parchment (3)


This is now the third miniature handbag that I have made from the pattern book by Amanda,Ching-Hsiang Yeh.  Amanda has designed many of these pretty bags and they are fun to do but a little fiddly in the assembly.  You seem to find that your fingers and thumbs suddenly seem a little large.  I would like to have a few of these on display at the next Sandown Craft Show which will be September 16th - 18th at Sandown Park Race Course.

Lacework coaster

I found  a pattern by Kannikar Sukseree (Kanny) in the Parchment Craft Guild Anniversary Book and decided I wanted to do it.  It consisted of two panels of lacework with lovely coloured roses in the middle.  I started off with the lace work and pricked out the first panel without any mistakes but not so in the second so....I continued to finish the first panel and then decided to use the resulting lace in a couple of coasters and here is one.
I also learned that  when I do the next one I will have to stitch the lace to the backing card.  I stuck this one with Perga Glue but of course clicking in the backing panel in has squashed the glue a bit.

Sunday, 15 May 2011

CD Sunday - Die Cutting / Yeehaw

This week at CD Sunday  we have a choice for you.  Being a very democratic team we vote on our themes and this was a split vote.  Since I do not possess a die cutting/embossing machine (difficult to believe but true) my choice was made for me.  Yeehaw it was.  Not too difficult though as I am the possessor of Joanna Sheen's - American Frontier CD -  which is all 'Yeehaw' - well mostly.
So here is my card:

A bit of fun which I hope you will like.  Apart from the brads, hat charm and peel-offs  it is all from American Frontier CD.
I have my own little private wager about the split I will see between the two themes.
I enjoyed looking at all your Oriental cards last week and I look forward to visiting your Blogs again this week so until then - YEEHAW.

Friday, 13 May 2011

What you can do whilst Mr. Blogger is down

I made this - sheer indulgence and it will have to be sliced and frozen as I can't eat it all myself  before the cream cheese icing goes off.


It is called a Hummingbird Cake and it is gorgeous.  So so sinful.

Islamic in Turquoise

I can't remember all that I wrote about this card - got lost in the ether when Blogger went down.  The pattern is from a Search Press Book by Janet Wilson - which I have had for some time.  The die cut flower which miraculously matched the ink I used on the parchment is from Craftwork Cards.  This is in  a kit called Fruit Scoop and is their Project of the month.

Tuesday, 10 May 2011

Water Iris


Guess who the designer is of this pattern.  Judith of course.  I am on such a roll with her patterns at the moment.  They are giving me such good practice with pen and ink and colouring.  The great thing about Judith's patterns - apart from the fact that they are all great designs - is that the borders are always different and attractive but not complicated gridwork so one can concentrate on the 'picture'.   That is my take anyway.

I used purple ink for the flower outlines and just one purple Faber Castell pencil for the colouring.   With the leaves I did use two colours of green pencil  as I wanted a darker one for shadow.  I changed the pattern in the oval- just to my taste  - and then stitched it all on to the BP with thread and little crystal beads.

Monday, 9 May 2011

The Enchanted Garden - 'Blackberry'


This is the second of the three Enchanted Garden patterns by Judith Maslen. I thoroughly enjoyed doing this one and confess to being pleased with the result.  Just the 'Cyclamen' one to do sometime. 
It is still just a topper at this stage and I will have to decide how to mount it.

The Enchanted Garden - 'Bluebell'

Another pattern by Judith Maslen.  I bought this one and the others in the series at the workshop on Saturday.  This is my interpretation.  The backing paper - printed straight to card - comes from a Cupcake CD.

More practice in penmanship and colouring,  on back and front with just two shades of blue, one green  and spreading medium.

Sunday, 8 May 2011

Workshop Wonders

Perhaps a bit cheeky to call them 'wonders' but I did enjoy the making of them.  A friend and I attended another Judith Maslen Workshop down in the New Forest on Saturday.  Our days there are always such fun and so instructive.  They are held every couple of months from March through to November and I admit to having booked my place at them all this year.
We always manage a couple of projects and our two yesterday were very popular with all.

This is the first one - all whitework - called 'Flowers by the Window'.

And the second one is called 'Pink Fantasy' - although I used red ink for mine. 
This was an exercise in penmanship and then using various dilutions of the same colour to add dimension and shading with a brush.
Judith will notice - if she visits - that the border I have presented here is a little different to what it was when I left the building.  I was trimming the edge and caught the scallops in the guillotine so I had improvise.  I cut off the originals and made a new larger parchment backing piece with new scallops.
Here it is:

CD Sunday - Lets go Oriental

For this card I used papers from  the Japanese Pattern Source book (CD) - Nature 2.  I used one paper as the background and another for the two birds which I cut out and attached just with glue.  The Japanese sentiment is from some peel offs in my stash.
I just used the papers and didn't add any embellishments because I feel the papers are so beautiful  by themselves.  In fact I just like looking at them for their own sake.

Congratulations to Kathleen for being our winner last week.  I hope to see many entries in our challenge this week.  I know how popular 'Oriental' is as a theme - so I will see you on your Blogs.

Tuesday, 3 May 2011

Jewelled Butterfly - same stamp - different look.

As promised here is another version,  using rainbow printed parchment.  Actually it is a'splodgy' rainbow backing paper from a Carol Ann's Studio CD printed directly to parchment.  I stamped out the butterfly from  Carolines in Stazon and then embossed the ovals and dots from the back and then used a fine grid and pricked out all the holes from the front that showed around the embossing.  As it is called the Jewelled Butterfly I felt it needed some zing so I added black gems from my stash which I felt complemented the pink of the background.  Antennae also from stash.
We then went out for photo shoot.  Hope you like this version as well.

Sunday, 1 May 2011

CD Sunday - Stamping

A lovely bright Sunday here in Surrey and another new challenge for you from CD Sunday.  This month we are generously sponsored by Digis with Attitude and  we hope we are going to see lots more of your gorgeous cards.  Also a CD Sunday welcome to Jen, our Guest Designer this month.

I don't do a lot of stamping these days as most of the images I use in parchment crafting are traced  and then embossed or drawn in pen and ink.  I do use CD's a lot but stamps not so much.  Anyway when I knew this one was coming up I fished out one of my favourite stamps and here is the result:


The image and sentiment are from Pink Cat Stamps coloured with watercolours. The BP is from JS Fashion Boutique, lace trim from Art of Craft and pearls by Kanban. The parchment flowers made by me from parchment paper I coloured using pencils and spreading medium.   I wanted to try for a 'bold and sassy attitude' which I hope I have achieved.
As always I look forward to visiting your Blogs.
xx

Saturday, 30 April 2011

Jewelled Butterfly Stamp from Carolines

I loved this stamp when I saw it on Carolines Blog.  Caroline had used a similar one  on a card she had entered into our challenge on CD Sunday and I just had to buy this one as well as  the one she had used.  This is my first play with it using it stamped on 140gsm parchment paper.
After I had stamped it I embossed the tiny circles from the back, painted the almond shapes on the front using PCE No: 3 (Pergamano felt tip pen).  Then on the back I scribbled with Faber Castell pencil No: 115 (Dark Cadmium Orange) and then spread it with Zest (spreading medium) to an even coat.  Then I embossed the painted almond shapes from the back which makes them lighter and 'pop' out.
I just took out the wings without the feelers and body and made my own parchment body which I attached using Perga Glue.  I then decorated the body with self adhesive Kanban half  pearls (my favourites) to look like a segmented thorax.  Then finished off with stamens (from stash) as feelers .

Hope you like it.  I had fun making it and perhaps you might like to have a go - it is really very easy. The colour combinations could be endless.  I want to stamp it on to rainbow parchment paper to see what effect I get.

Wednesday, 27 April 2011

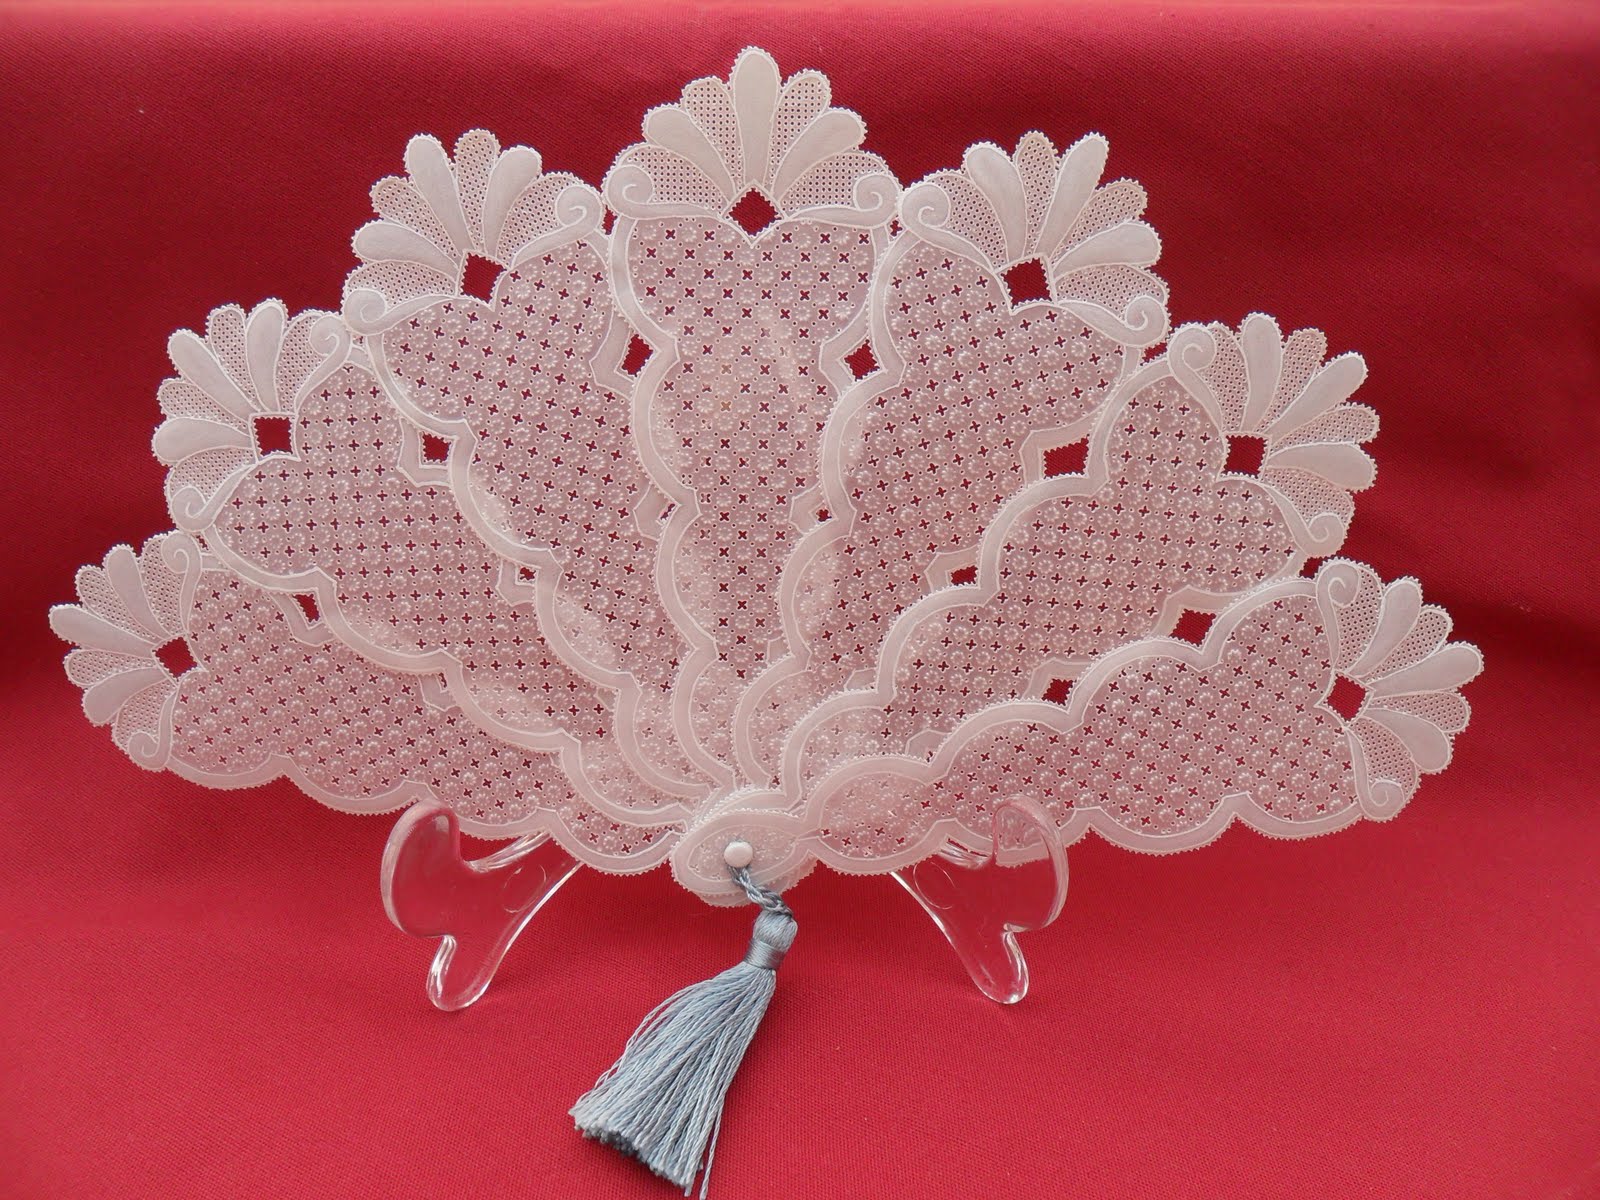
Fan - pattern by Gilly Howe


Gilly's pattern has two sizes for this fan and this is the larger one.  I made the smaller one some time ago.  I just felt the need to sit and do some gridwork and there is a lot of that in this pattern.  The finished size is almost 10" across and 5.5" high excluding the tassel.

Sunday, 24 April 2011

CD SUNDAY - Butterflies


For this weeks Cd Sunday Challenge I have used 2 different papers from the Cd that comes with the Japanese Pattern Source Book Nature 2.  I cut the butterflies out  from the second sheet and attached them  strategically to the first background sheet and added sticky pads to raise the wings. The bodies are pearl oval beads and Chinese crystals for the heads.
There seems to be a series of these pattern books (Amazon - I think) and the papers are gorgeous.  It was my friend Debs who introduced them to me.

Thank you all for joining us with our Birthday Celebrations.  As Jenny said on our Blog  this week, we do look at your Blogs whilst we are there.  Last week I found the image from Karen's Doodles via a Blog and also bought some stamps from Carolines. Both things used on your cards.

Looking forward to visiting your Blogs.
xx

Saturday, 23 April 2011

Digi Stamps and parchment

Anne from Card Challenges and my fellow teamie Jenny pointed me in the right direction on Karens Doodles to download a freebie design  that Anne had used and I just felt that it cried out to be used on parchment. This is what I have done with it as a 'first go'.


I haven't finished it completely as I intend to do a better one with better embossing and better shading with the pencils - esp on the basket. It hasn't any depth at the moment.  I used my Faber Castell Polychromos pencils for the colouring.
I want to do it again more carefully and add a good border.

Tuesday, 19 April 2011

Lilies - Workshop Project


This is my finished project that was set by Dorothy Holness at our recent Parchment Festival.  I have called them Lilies because they look like them to me and they were unamed.  I learned so much about colouring properly on parchment from Dorothy and of course from the other experts we were lucky to have over that weekend.
I loved doing this and have enjoyed this afternoon just adding a little here and a little there to finish it to what I hope would be acceptable to Dorothy. An incredible teacher and you just want to please her.

I still have to mount this -  but I may just keep it in my portfolio as is.

Sunday, 17 April 2011

It's our 1st Birthday on CD Sunday.........................

and to celebrate we are offering a first and second prize in our Challenge this week and all you have to do is make a BIRTHDAY CARD - and we all need to make those so this is an easy peasy challenge. You just need to make sure that you have used a CD somewhere in the making of the card and that you also tell us which one you have used. You could use one for the complete card or for a tiny part of it such as the sentiment. As this is OUR special prize-giving challenge we on the Design team will choose the winners ourselves so as Jenny said on the Blog - please Wow us with your creations.

Here is my offering but unfortunately I am 'exempt from taking part' as they say.


I used Carol Ann's Studio - Glitz 'n' Bitz CD for the BP. Lace and ribbon from The Art of Craft and I had the stitching pattern already. I thought the single candle very appropriate.

Wednesday, 13 April 2011

Report on the Parchment Festival

Now that I have recovered from our fabulous festival I can write this little report.
I have had the most exhilerating and fun 3 days that I have had for some time.
Debs arrived on Thursday, late afternoon. Plenty of time for chat and a leisurely supper before we checked and rechecked everything we needed for the workshops on Friday. Our first workshop was with Kanny using colour pencils on black parchment. We learned how to use transfer paper and how to use white pencil as the base before going on to use layers of colour to create the most beautiful flowers. Orchids on this occasion. Kanny is soooooo talented. Her work is awesome and she is such a delightful person as well.
The afternoon session was with Dorothy Holness. I have had the privilege of having lessons with Dorothy before and I knew that I was going to enjoy every moment. Our project was to trace the image (flowers) with pen and ink and then colour using polychromos pencils on the back and the front. Then to emboss parts of the flowers to show shading and then bring it all to life. I have nearly finished this project and will post it when I have completed it. I must admit to being pleased with what I have done so far on this one and felt more at home with this kind of project. We don't all like the same disciplines and this was more in my comfort zone.

The Festival itself was on Saturday and we had a ball. I can't remember when I last talked so much about anything and everything parchment and other stuff. I met so many lovely people and we talked about how to do crosses, use a star tool, make flowers, removing greasy marks from parchment and even down to exactly which hand cream I use which doesn't mark the paper and where I get my tool stands from. So much I can't remember it all. Many of the show goers were ladies (and gentlemen) that I have met at previous shows and it was like seeing old friends again.

The second day of workshops was on Sunday. The first was with Tina Cox and she was as enthusiastic and as bubbly as ever. We learned so much abouting painting techniques on parchment using mostly felt tip pens and a very fine brush. My picture is almost finished but then there is a gorgeous grid border frame to be done before it is all finished and that may take me some time.
The last workshop was taken by Dorothy again who was standing in for Linda Williams who sadly couldn't make it at the last minute. Dorothy did a magnificent job of teaching someone elses designs and project which just goes to show how talented our designers are.
This project was awesome and I really - for the first time - felt that I was getting somewhere with my colouring on parchment. I am including a scan of the image at it's current stage but there is so much more to do. You really do learn patience in this craft along with all the other techniques.
There are several more stages to go through on this including adjusting the colouring on the face, and this is before attempting the border and finishing touches. The work is still attached to the pattern.

Sunday, 10 April 2011

CD Sunday - A Song in my heart


The stitch and bead pattern is a purchased download pattern from Stitching Cards. The base card, BP and tag all printed from Carol Ann's Studio CD-10 Adorable Hearts 1. The words were stamped with alphabet stamps and the blue heart button from stash.


Well done to Janet for winning the draw last week. I hope you enjoy using your prize digi stamps as much as we did.

It will be a special week for us next week so please keep an eye on our site for further details.

In the meantime I look forward to seeing some great cards on our theme of 'A song in my Heart'.

Wednesday, 6 April 2011

Sarah Kaye - from Mettemusen site

SOLD AT THE FESTIVAL
I printed out and painted this little one some time ago but I think I must have over embossed the border I used as it all seemed to buckle. I didn't want to waste all that work so I 'took out' the image using a fine stamp edge tool and using Perga Glue just on the very edges have fixed her to a new border frame. If you add the smallest amount of Perga Glue you will find that it doesn't show through the parchment.
The border I have used is one by Florence Holmes - one of her 'need to think about' ones. I had already fastened the frame to the base card with Perga Glue again so this time the beads are sewn on just for decoration.
For the base card I used a backing paper from a Carol Ann's Studio CD printed directly to a matt linen A4 card.

Sunday, 3 April 2011

CD Sunday - Someone Special - sponsored by WhoopsiDaisy Designs


I printed out one of the images generously given to the design team by our sponsor WhoopsiDaisy and coloured with Promarkers and glittered the wings. I then cut it out and glued to a scene I made using MCS.
The name drawn out of the hat will win 4 sheets of Digi Images from our sponsor.
So in the words of that old and probably, by now, boring adage - 'You have to be in it to win it'.
We always look forward to visiting your blogs and personally I am in awe of the amazing talented crafters there are in 'Blogland'.

If you read our Blog you will have seen that it is our 1st Birthday this month and we will be having a special challenge with prizes - so there are two chances this month to be a winner.

(p.s.It is also my Blog 1st Birthday this month.)

Friday, 1 April 2011

Spring Butterflies and Lace


This is a little 5 x 5 card made using Debbees CD - Spring Butterflies and Lace. This is from Folder 16 and the card is the 'tile' printed direct. I then printed one of the toppers twice in parchment. The first layer was embossed with a sun tool and then the second layer was used to make the 3D butterfly. I embossed the wings and then cut it out. The body was made using a couple of long beads for the body and two small rounds for the head. It was then mounted on to blue mirri card and then to a pink mirri card mat. The sentiment comes from a Carol Ann's Studio CD and the little tiny parchment flower I made. The pearls are from Kanban - my favourites when I am not colouring my own.

Thursday, 31 March 2011

Some more ATC's using Debbees Cd's


These are from Waterside Watercolour (Summer)
Waterside Watercolours Shades of Autumn
Waterside Watercolours Winters Sleep

These 3 CD's are all based on seasonal paintings of the same scene in France. They are the work of Deb's Mother, Tina Cottis, who is a talented artist as you can see.
These are all available on Deb's site - see sidebar.

Wednesday, 30 March 2011

Parchment Atc's using DEBBEES CD's

The date for our Parchment Festival is getting ever closer. My friend Debs of Debbees CD's will be there with her stand (and so will I of course - esp as she is staying with me). One of her CD's that is my favourite is Pamela West's 'Dayze of Innocence'. This one in particular because it lends itself to parchment.
For the NEC last November I made a few parchment ATC's using the 7 folder images but of course they were given away so I have spent this evening making another set.
Here they are and if you want the chance to have one of these you will have to come to the Festival to do a swop or even perhaps buy the Cd so that you can make your own.


I hope you like these as much as I have enjoyed making them. Initially I made then to show how you can manipulate the sizes from the Jpeg and not lose any clarity of detail. Now I just enjoy them as Atc's. I belong to a couple of ATC clubs and thoroughly enjoy making and swopping.